Tuesday, October 3, 2017

Debian 9 touch screen calibration (ENG)


Touchscreen mouse calibration is tested for the following OS:


  • Description: Debian GNU/Linux 9.1 (stretch)
  • Release: 9.1
  • ernel: Linux 4.9.0-3-686-pae
  • Architecture: x86


For touch screen we can use libinput or evdev driver. Libinput replaces the evdev driver. The configuration below is created for evdev. In the other words We use evdev.


  • Get information about xserver-xorg-input.


dpkg -l | grep xserver-xorg-input


Result:


As we see there is no evdev driver.


  • Let's install evdev driver.

apt-get install xserver-xorg-input-evdev


  • Check if evdev driver is installed


dpkg -l | grep xserver-xorg-input


Result:


  • Check if configuration files are in /usr/share/X11/xorg.conf.d directory.


cd /usr/share/X11/xorg.conf.d ls

result:

 
10-amdgpu.conf 10-evdev.conf 10-quirks.conf 40-libinput.conf 70-wacom.conf


  • now remove libinput driver or we can just remove touch screen section from libinput driver configuration file.


in order to remove libinput driver with dependent packages:


apt-get remove --auto-remove xserver-xorg-input-libinput


in order to disable libinput touch scree:

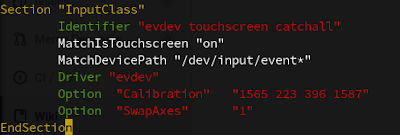
open 40-libinput.conf and remove a touchscreen InputClass Section that is shown in image below.


  • now install xinput-calibrator


sudo apt-get install xinput-calibrator


  • Check if you need to swap axes. if you need to swap just run:


xinit set-int-prop "eGalax Inc." "Evdev Axes Swap" 8 1


  • Run calibrator to get correct x,y positions.

 
xinput_calibrator --output-type xinput

The result will be like this:


Now everything should be fine, but if we want to make calibration permanent (after system restart),  open 10-evdev.conf config, find touch screen section and add "Calibration" and "SwapAxes" entries.


If we don't want to touch evdev configuration we can run the folloing command after X11 load:


xinput set-prop "eGalax Inc." "Evdev Axis Calibration" 1543, 222, 409, 1582 xinput set-prop "eGalax Inc." "Evdev Axes Swap" 1
if you want to configure libinput instead of evdev, remove evdev driver and install lib input if the last one is removed:
dpkg -P xserver-xorg-input-evdev apt-get install xserver-xorg-input-libinput

Wednesday, May 24, 2017

dnsmasq in Gnu/Linux


dnsmasq არის DNS forwarder და ასევე შეგვიძლია გამოვიყენოთ როგორც DCHP სერვერად. სხვა სიტყვებით რომ ვთქვათ dnsmasq საშუალებით ჩვენ შეგვიძლია DNS ის ქეშირება/ჩვენ გემოზე კონფიგურაცია სიჩქარის გასაზრდელად,  ასევე  როუტების,  internal IP გასაწერად.

მიუხედავად იმისა, რომ პირადად Open Suse Leap ზე ვმუშაობ, უნდა ვაღიარო,   ერთერთი ყველაზე კარგი დოკუმენტაცია  archlinux აქვს.  შესაბამისად,  ზოგჯერ, arch ის დოკუმენტაციაშიც ვიხედები. ხშირად ბევრი რამე პირდაპირ ემთხვევა.  მოკლედ, დეტალებში თუ დაგაინტერებთ იხილეთ შემდეგი ლინკი.


პატარა მაგალითი მოვიყვანოთ:

წარმოიდგინეთ მუშაობთ კომპანიაში სადაც გაქვთ შიდა DNS სერვერი.  როგორც Google-ს მოყვარული ჩემთვის პრიორიტეტი ყოველთვის 8.8.8.8 არის, გამომდინარე იქიდან, რომ ხშირად ვაწყდები ისეთ სიტუაციას, როდესაც შიდა DNS სერვერი ცუდად მუშაობს.

გამოსავალი:

1. მოვახდინო ქეშირება.
2. თუ შიდა სერვერი არაა, გავიდე გუგლის DNS მეშვეობით.


 პირველ რიგში ვნახოთ, dnsmasq თუ გვიყენია.  დაყენების ინსტრუქცია just google (გააჩნია დისტროს  zypper, apt-get, yast, etc...)

 სტატუსი:

vq@local:/etc/NetworkManager> sudo systemctl status dnsmasq.service 
root's password:
dnsmasq.service - DNS caching server.
   Loaded: loaded (/usr/lib/systemd/system/dnsmasq.service; enabled; 
 vendor preset: disabled)
  Drop-In: /run/systemd/generator/dnsmasq.service.d
           └─50-insserv.conf-$named.conf
   Active: active (running) since Wed 2017-05-24 11:22:19 +04;  
 34min ago
  Process: 5341 ExecStartPre=/usr/sbin/dnsmasq --test 
 (code=exited, status=0/SUCCESS)
 Main PID: 5344 (dnsmasq)
    Tasks: 1 (limit: 512)
   Memory: 464.0K
      CPU: 244ms
   CGroup: /system.slice/dnsmasq.service
           └─5344 /usr/sbin/dnsmasq --log-async 
 --enable-dbus --keep-in-foreground


შემდეგი ნაბიჯი (საჭიროა კომენტარების მოხსნა კონფიგურაციის ფაილში და გადაკეთება თქვენს გემოზე):

vim /etc/dnsmasq.conf 
resolv-file=/etc/resolv.dnsmasq.conf
strict-order
server=/დომეინი /DNS მისამართი
listen-address=127.0.0.1
bind-interfaces
vim /etc/resolv.dnsmasq.conf
nameserver 8.8.4.4
nameserver 8.8.8.8
იმის შემდეგ, რაც NetworkManager - ს ვეტყვით რომ 127.0.0.1-ს მოუსმინოს, შევამოწმოთ, რომ მართლაც 127.0.0.1 -ს უსმენს:

vim /etc/resolv.conf  nameserver 127.0.0.1 
vq@local:/etc> nmcli dev show | grep DNS
IP4.DNS[1]:                             127.0.0.1 

vq@local:/etc> nslookup domain
Server:        127.0.0.1