Friday, July 13, 2018

How to install JDK on linux and how it really works?

How to install JDK on linux and how it really works?

You may , well, ask me the question - which installation file should you download for your Linux. You know, you have many options: prm or deb or tar.gz


What is difference between rpm and deb file formats?

  • RPM and DEB files files provide an easy way for software to be distributed, installed, upgraded, and removed 
  • tag.gz is g-zipped tar file. You should download it if you are going to install JDK manually.

What is difference between deb and rpm file formats?

To be honest, therey are both archive files, with some metadata. In order to install deb file you need dpkg - this is package manager for Debian-based systems like Ubuntu, Debian etc. For rpm file format we use RPM Package Manager.

What about dependency problem?

Everything seems great but sometimes we have dependency problems.  In the other words, we had better install all dependencies for our program to work correctly.  Therefor RPM and dpkg  is unable to automatically do it.   Fortunately we have many tools in order to sole the problem:

  • APT (the Advanced Packaging Tool) to install, update and remove software  on Debian-based systems. 
  • YUM  package-management utility that uses the RPM Package Manager.
  • Zypper this is my favorite  package manager for installing, updating and removing packages as well as for managing repositories.  

How To install RPM format JDK on linux?


This method is suitable for SUSE/Arch/Fedora/CentOS/RedHat etc. You should just have RPM package manager.
 

  •  Download oracle jdk RPM package
  • To install using terminal type: `rpm -ivh {jdk-name-version}.rpm`
  • Run the following commands
update-alternatives --install /usr/bin/java java /usr/java/latest/bin/java 100
update-alternatives --install /usr/bin/javac javac /usr/java/latest/bin/javac 100
view raw update_java_path.sh hosted with ❤ by GitHub
  • Set default Java for in system

update-alternatives --config java
update-alternatives --config javac
view raw default_java.sh hosted with ❤ by GitHub


How to install  tar.gz format zypped JDK on linux?


  •  Download oracle jdk tar.gz
  •  mkdir /opt/jdk
  •  tar -zxf {jdk-name-version}.tar.gz -C /opt/jdk
  • update-alternatives --install /usr/bin/java java /opt/jdk/{jdk-name-version}/bin/java 100
  • update-alternatives --install /usr/bin/javac javac /opt/jdk/{jdk-name-version}/bin/javac 100
Check if java is installed

  •  update-alternatives --display java
  •  update-alternatives --display javac
 Set default Java for in System
  •  update-alternatives --config java
  •  update-alternatives --config javac


how to change shceduler times in spring

How to change scheduler times in Spring


Imagine that you have scheduler but you want to change time at runtime. What Can you do? Off-course there are ways do solve the problem. So In this article I will write how to implement Trigger interface that is located to the following package: org.springframework.scheduling in the spring-context project.

1. First off all, let's create interface for our logic:


2. In Spring we have org.springframework.scheduling.Trigger interface:


So we can write our own implementation. It's very simple. We should just overwrite nextExecutionTime(_) method.  Something like that:


3. Now we can write configuration.


In this example we just choose ThreadPoolTaskScheduler that is child ofTaskScheduler interface.


4. So what is the next? Let's see how to use our scheduler. Everything is simple:


That's it!

Goodbye!
Have good day!

Tuesday, January 16, 2018

Running rsync as a daemon


rsync is a very flexible utility for  transferring and synchronizing files across computer systems. For example, when we want to run updates to the remote devices, we can just update some files in the rsync server and another remote devices will receive the updated files automatically.


Rsync has three ways to decide if a file is outdated:
  1. Compare size of files
  2. Compare timestamps
  3. Compare static checksums

So we can choose   --size-only, --ignore-times or ---checksum option in order to decide how to compare files.


Let's write little example

  • Let's create some directory and write some files in it. The idea is the following: if we add any files in the directory , remote devices will revieve that files (any devices who have rsync client)

mkdir /opt/{my_app_settings}/dev/
  •  Edit rsyncd.conf file and write configurations. I have created 2 configuration. But before editing the file imagine that some remote devices mught need to revieve files from different directory. We have already created directory named "dev" but we can also can create another directory. For example let's create another directory named "prod". So rsync client will decide which directory to use  - in the other words where to get files. So our configuration looks like that:

[dev] 
path = /opt/{my_app_settings}/dev 
read only = true
uid = root
gid = root


[prod]
path = /opt/{my_app_settings}/prod 
read only = true 
uid = root 
gid = root 

  • Run rsync daemon

 rsync --daemon 

  • Run rsync client in order to retrieve new files:

  rsync -rtv root@IP::dev {destionation_directory} 


Also we can create sheduler in order to execute auto synchronization.

 crontab -e 

If you want to run cron job every 1 minute, write the following  cron config


  • Cron examples


Every 1 minute     * * * * * 
Every 15 minutea   */15 * * * * 
Every 30 minutes   */30 * * * * 
Every 1 hour       0 * * * * 
Every 6 hours      0 */6 * * * 
Every 12 hours     0 */12 * * * 
Once a day         4 0 * * *
Once a week        4 0 * * 0 
Once a month       4 0 1 * * 


Now just verify your cron job

 crontab -l 
Results should be something like that:

Tuesday, October 3, 2017

Debian 9 touch screen calibration (ENG)


Touchscreen mouse calibration is tested for the following OS:


  • Description: Debian GNU/Linux 9.1 (stretch)
  • Release: 9.1
  • ernel: Linux 4.9.0-3-686-pae
  • Architecture: x86


For touch screen we can use libinput or evdev driver. Libinput replaces the evdev driver. The configuration below is created for evdev. In the other words We use evdev.


  • Get information about xserver-xorg-input.


dpkg -l | grep xserver-xorg-input


Result:


As we see there is no evdev driver.


  • Let's install evdev driver.

apt-get install xserver-xorg-input-evdev


  • Check if evdev driver is installed


dpkg -l | grep xserver-xorg-input


Result:


  • Check if configuration files are in /usr/share/X11/xorg.conf.d directory.


cd /usr/share/X11/xorg.conf.d ls

result:

 
10-amdgpu.conf 10-evdev.conf 10-quirks.conf 40-libinput.conf 70-wacom.conf


  • now remove libinput driver or we can just remove touch screen section from libinput driver configuration file.


in order to remove libinput driver with dependent packages:


apt-get remove --auto-remove xserver-xorg-input-libinput


in order to disable libinput touch scree:

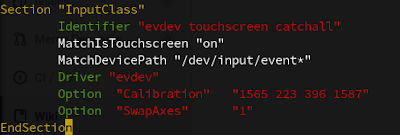
open 40-libinput.conf and remove a touchscreen InputClass Section that is shown in image below.


  • now install xinput-calibrator


sudo apt-get install xinput-calibrator


  • Check if you need to swap axes. if you need to swap just run:


xinit set-int-prop "eGalax Inc." "Evdev Axes Swap" 8 1


  • Run calibrator to get correct x,y positions.

 
xinput_calibrator --output-type xinput

The result will be like this:


Now everything should be fine, but if we want to make calibration permanent (after system restart),  open 10-evdev.conf config, find touch screen section and add "Calibration" and "SwapAxes" entries.


If we don't want to touch evdev configuration we can run the folloing command after X11 load:


xinput set-prop "eGalax Inc." "Evdev Axis Calibration" 1543, 222, 409, 1582 xinput set-prop "eGalax Inc." "Evdev Axes Swap" 1
if you want to configure libinput instead of evdev, remove evdev driver and install lib input if the last one is removed:
dpkg -P xserver-xorg-input-evdev apt-get install xserver-xorg-input-libinput

Wednesday, May 24, 2017

dnsmasq in Gnu/Linux


dnsmasq არის DNS forwarder და ასევე შეგვიძლია გამოვიყენოთ როგორც DCHP სერვერად. სხვა სიტყვებით რომ ვთქვათ dnsmasq საშუალებით ჩვენ შეგვიძლია DNS ის ქეშირება/ჩვენ გემოზე კონფიგურაცია სიჩქარის გასაზრდელად,  ასევე  როუტების,  internal IP გასაწერად.

მიუხედავად იმისა, რომ პირადად Open Suse Leap ზე ვმუშაობ, უნდა ვაღიარო,   ერთერთი ყველაზე კარგი დოკუმენტაცია  archlinux აქვს.  შესაბამისად,  ზოგჯერ, arch ის დოკუმენტაციაშიც ვიხედები. ხშირად ბევრი რამე პირდაპირ ემთხვევა.  მოკლედ, დეტალებში თუ დაგაინტერებთ იხილეთ შემდეგი ლინკი.


პატარა მაგალითი მოვიყვანოთ:

წარმოიდგინეთ მუშაობთ კომპანიაში სადაც გაქვთ შიდა DNS სერვერი.  როგორც Google-ს მოყვარული ჩემთვის პრიორიტეტი ყოველთვის 8.8.8.8 არის, გამომდინარე იქიდან, რომ ხშირად ვაწყდები ისეთ სიტუაციას, როდესაც შიდა DNS სერვერი ცუდად მუშაობს.

გამოსავალი:

1. მოვახდინო ქეშირება.
2. თუ შიდა სერვერი არაა, გავიდე გუგლის DNS მეშვეობით.


 პირველ რიგში ვნახოთ, dnsmasq თუ გვიყენია.  დაყენების ინსტრუქცია just google (გააჩნია დისტროს  zypper, apt-get, yast, etc...)

 სტატუსი:

vq@local:/etc/NetworkManager> sudo systemctl status dnsmasq.service 
root's password:
dnsmasq.service - DNS caching server.
   Loaded: loaded (/usr/lib/systemd/system/dnsmasq.service; enabled; 
 vendor preset: disabled)
  Drop-In: /run/systemd/generator/dnsmasq.service.d
           └─50-insserv.conf-$named.conf
   Active: active (running) since Wed 2017-05-24 11:22:19 +04;  
 34min ago
  Process: 5341 ExecStartPre=/usr/sbin/dnsmasq --test 
 (code=exited, status=0/SUCCESS)
 Main PID: 5344 (dnsmasq)
    Tasks: 1 (limit: 512)
   Memory: 464.0K
      CPU: 244ms
   CGroup: /system.slice/dnsmasq.service
           └─5344 /usr/sbin/dnsmasq --log-async 
 --enable-dbus --keep-in-foreground


შემდეგი ნაბიჯი (საჭიროა კომენტარების მოხსნა კონფიგურაციის ფაილში და გადაკეთება თქვენს გემოზე):

vim /etc/dnsmasq.conf 
resolv-file=/etc/resolv.dnsmasq.conf
strict-order
server=/დომეინი /DNS მისამართი
listen-address=127.0.0.1
bind-interfaces
vim /etc/resolv.dnsmasq.conf
nameserver 8.8.4.4
nameserver 8.8.8.8
იმის შემდეგ, რაც NetworkManager - ს ვეტყვით რომ 127.0.0.1-ს მოუსმინოს, შევამოწმოთ, რომ მართლაც 127.0.0.1 -ს უსმენს:

vim /etc/resolv.conf  nameserver 127.0.0.1 
vq@local:/etc> nmcli dev show | grep DNS
IP4.DNS[1]:                             127.0.0.1 

vq@local:/etc> nslookup domain
Server:        127.0.0.1


Sunday, April 17, 2016

English to Georgian Dictionary for Kindle FREE


ქინდლისვის გავაკეთე ლექსიკონი. წიგნის კითხვის დროს მონიშნავთ სიტყვას და ავტომატურად გაიხსნება ფანჯარა, სადაც მონიშნული სიტყვის განმარტებას ნახავთ.


Google drive დან ფაილის გადმოსაწერი ლინკი

ესეც ლინკი ამაზონზე

იმედია მოგეწონებათ :) 


Friday, January 15, 2016

JNA & JNI Intro

JNA & JNI


ასე 1 წელიწადი იქნება რაც არაფერი დამიწერია ბლოგზე. მეგობრის თხოვნით პატარა სტატია მივუძღვენი JNA-ს.

Java Native Access  და Java Native Interface ბიბლიოთეკები გამოიყენება C , C++, assembly ზე დაწერილი კოდების გამოსაძახებლად (C++ ვრაფერი JNA არ აქვს, ხელით უნდა დაწეროთ ან შეგიძლიათ გამოიყენოთ JNA-ს შვილობილი პროექტები, როგორიცაა მაგალითად BridJ და სხვა მრავალი).  C/C++ ენაზე მიჩვეული დეველოპერი JNI-ს აირჩევს, რადგან კონვერტაციები Native მხარეს არის იმლემენტირებული, ვისთვისაც Java ენაა უფრო ახლოს, ის JNA აირჩევს, რადგანაც კონვერტაციები Java მხარეს ხდება. გამოყენების არეალი ორივეს დიდი აქვს, მაგალითად JNA-ს იყენებს Apache Cassandra რომელიც არის ერთერთი საუკეთესო NoSQL მონაცემთა ბაზა , რომელიც CAP  Theorem ის მიხედვით Availability სა და Partition Tolerance -ს შორის ზის. ასევე JetBrains ის მიერ შექმნილი ცნობილი InteliJ IDEA, Netbeans IDE და ასე შემდეგ.

JNA ზე მაგალითები , ბიბლიოთეკასთან ერთად, შეგიძლიათ ნახოთ შემდეგ ლინკზე:
https://github.com/java-native-access/jna.git


თვალსაჩინოებისთვის დავწეროთ მარტივი მაგალითი.

header.h
#ifndef HEADER_H_INCLUDED
#define HEADER_H_INCLUDED 

int  buildRequest(char * input, char * answer, int inputLenth);  

typedef void(*NotificationListener)(char *, int);
void callbackTriger(const NotificationListener l); 
void getDeviceRandomStatus(char *answer, int sizeOfChars); 
int randNum( int min,  int max); 

#endif // HEADER_H_INCLUDED


header.c
#include<stdio.h>
#include "header.h"
#include <stdlib.h>
#include <time.h>


int buildRequest(char * input, char * answer, int inputLenth) {
  printf("C: log passed params from java to C: ");
  int i = 0;
  for (; *input; ++input) {
    i++;
    if (i > inputLenth) {
          break;
    }
    char c = *input;
    int i = (int) c;
    printf("%d ", i);
  }
  printf("\n");
  answer[0] = 0xFE;
  answer[1] = 0x81;
  return i - 1;
}

void callbackTriger(const NotificationListener l) {
  int size = randNum(1, 20);
  char answer[size];
  getDeviceRandomStatus(answer, size);
  (*l)(answer, sizeof(answer));
}

void getDeviceRandomStatus(char *answer, int sizeOfChars) {
  int i;
  for (i = 0; i < sizeOfChars; i++) {
        int i = randNum(0, 255);
        answer[i] = i + '0';
  }
}

int randNum(int min, int max) {
  srand(time(NULL));
  double scaled = (double) rand() / RAND_MAX;
  int val = (max - min + 1) * scaled + min;
  return val;
} 


mainc.c    გამოვიყენებთ ბიბლიოთეკის გასატესტად (ის Shared Library რომელიც შემდგომ უნდა ჩაბამათ Java კოდში ში JNA დახმარებით)
#include<stdio.h>
#include <limits.h>
#include <stdlib.h>

int main(void)
{
     char ch [] = {0x01, 0x07, 0x09 ,0xA, 0xB,0xC, 0xD,0xE ,0xF };
     char answer[2];
     int r=buildRequest(ch, answer, 5);
     printf("Returned params: ");

     int i;
     for (i = 0; i < sizeof(answer); ++i){
           printf("%d ", answer[i]);
     }

    return 0; 


}


შევქმნათ Shared ბიბლიოთეკა და გავტესტოთ. ამ სკრიპტებით შექიმნება header.o და libHeader.so, შემდეგ main ს მივაბამთ და გავტესტავთ:
gcc -c -Wall -Werror -fpic header.c 
gcc -shared -o libHeader.so header.o
gcc main.c -o main -lHeader -L/home/vq/Desktop -Wl,-rpath=/home/vq/Desktop
./main


ახლა დავწეროთ რამდენიმე მაგალითი, ერთი უბრალოდ Java დან C კოდის გამოძახება, მეორე კი პირიქით ანუ callback. განვიხილოთ buildRequest ფუნქციის გამოძახების მაგალითი -  ბაიტების მასივი წარმოდგენილი გვაქვს როგორც char *, როგორც input ისე output რაც უნდა დაბრუნდეს, ასევე აქ გვჭირდება ერთი დამხარე პრიმიტივი ბაიტების მასივის ზომის განსასაზღვრად. callbackTriger -ის შემთხვევაში პოინტერი გვაქვს პარამეტრად NotificationListener ის რომელიც ჰედერშია გამოცხადებული, pointer-to-function ტიპი. რაც შეეხება randNum და getDeviceRundomStatus, ესენი უბრალო მეთდებია შემთხვევითი ზომის და მნიშვნელობების ბაიტების მასივის დასაბრუნებლად.


import java.util.Arrays;
import java.util.logging.Logger;

import com.sun.jna.Callback;
import com.sun.jna.Library;
import com.sun.jna.Memory;
import com.sun.jna.Native;
import com.sun.jna.Pointer;

/**
 * 
 * @author vakhtang Koroghlishvili
 * 
 */
public class BuildRequestMaker {

public static Logger log = Logger.getLogger(CallBack.class
  .getSimpleName());

public interface CLibrary extends Library {

 public int buildRequest(Pointer input, Pointer output,
   int inputLenth);
}

public interface CLibraryCallBack extends Library {

 public interface NotificationListener extends Callback {
  void invoke(Pointer val, int lenth);
 }

 public static class NotificationListenerImpl implements
   NotificationListener {
  @Override
  public void invoke(Pointer val, int lenth) {
   log.info("java mehtod, callback: "
     + Arrays.toString(val.getByteArray(0, lenth)));
  }
 }

 public void callbackTriger(NotificationListener callback);
}

public byte[] buildRequest(byte[] inputArr) {

 CLibrary clib = (CLibrary) Native.loadLibrary(
   "/home/vq/Desktop/libHeader.so", CLibrary.class);

 Pointer input = new Memory(inputArr.length
   * Native.getNativeSize(Byte.TYPE));
 Pointer answer = new Memory(inputArr.length
   * Native.getNativeSize(Byte.TYPE));

 for (int i = 0; i < inputArr.length; i++) {
  input.setByte(i * Native.getNativeSize(Byte.TYPE),
    inputArr[i]);
 }

 int resultSize = clib.buildRequest(input, answer,
   inputArr.length);

 log.info("returned value from c lib is: " + resultSize);
 byte[] resultByte = answer.getByteArray(0, resultSize);

 log.info("returned value array from c lib is: "
   + Arrays.toString(resultByte));

 return resultByte;

}

public void callBackListener() {

 CLibraryCallBack clib = (CLibraryCallBack) Native
   .loadLibrary("/home/vq/Desktop/libHeader.so",
     CLibraryCallBack.class);

 // instantiate a callback wrapper instance
 CLibraryCallBack.NotificationListenerImpl callbackImpl = new CLibraryCallBack.NotificationListenerImpl();

 // pass the callback wrapper to the C library
 clib.callbackTriger(callbackImpl);

 }

}


და ტესტები:


import org.junit.Assert;
import org.junit.Test;

public class JNATests {

 @Test
 public void buildRequestTest() {
  BuildRequestMaker m = new BuildRequestMaker();
  byte[] input = { (byte) 0x81, (byte) 0xFE };
  byte[] expect = { (byte) 0xFE, (byte) 0x81 };
  Assert.assertArrayEquals(expect, m.buildRequest(input));
 }

 @Test
 public void callBacklTest() {
  BuildRequestMaker m = new BuildRequestMaker();
  Exception ex = null;
  try {
   m.callBackListener();
  } catch (Exception e) {
   ex = e;
  }
  Assert.assertEquals(null, ex);
 }
შედეგები:
INFO: started call back listener
INFO: java mehtod, callback: [-64, -28, 119, 124, 84, 127, 0, 0]
...
INFO: started building request
INFO: returned value from c lib is: 2
INFO: returned value array from c lib is: [-2, -127]
C: log passed params from java to C: -127 -2 


ეს მაგალითი, ისე, დამატებითი დეტალებისთვის Just Google